Wednesday, October 2, 2013

Clean and Clever

I am all about functionality and cleanliness. Our garage right now is a big ole mess (so bad I won't be sharing a picture until I have an after picture of it all organized...who knows when that will be)
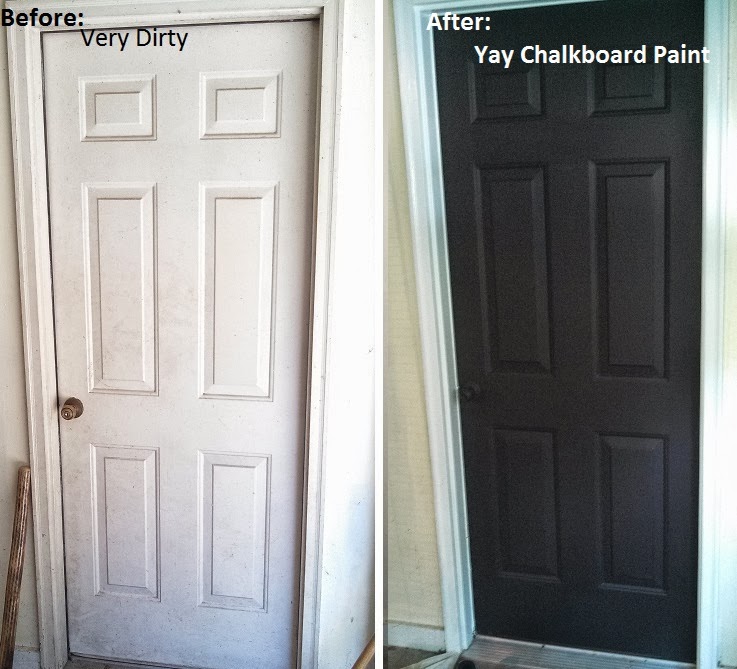
However, a small project that has made me feel much better about our garage because I use it A lot is the door to the garage from our house.
Super dirty so I cleaned it with water and vinegar and some good old elbow grease.
The following picture does not do it justice since the lighting isn't great in our garage (the before was way dirtier than it appears in this picture)
But here you go dirty then clean:
So Like I said I like things to be clean and if you are going to be painting you don't want to painting over years of dirt and grime and dust and cob webs etc...
But I really had no desire to go with white since it would just show dirt again really fast because its the garage and for my Husband and I the main mode of entry to our house so it gets lots of traffic.
So I started toying with the idea of a black garage door to hide dirty finger print spots...
But I have been loving the idea of a chalkboard somewhere in the house because its fun and trendy.
So I got some rustoleum chalkboard paint and after cleaning that hideousness away painted on that black chalkboard paint...
Reasons I liked the idea
1. Hides dirt better
2. Can write fun messages to the hubby/guests
3. The chalk dust goes to the floor of the garage as oppose to inside the house where I would constantly be cleaning it up
4.When we have kids or nieces and nephews come over theres something for them to do indoors

How I did it
1. Clean the door
2. Paint with chalkboard paint
3. Paint the trim (true high gloss white)
4. Let cure for 3 days
5. Rub all over with Chalk... let sit for a bit then wipe off with a damp rag and you're ready to go

Here you are the "real" Before and After (and yes I did paint the doorknob since it was super scratched up and terrible looking)

Next project: Make a little holder for the chalk and eraser so its not lost all over the garage and house!
Ill let you know how I like it... and whether or not we use it as much as all the ones people put in their kitchens and around their houses!


Sunday, August 25, 2013

Anniversarys: Birthdays and Marriage

We celebrate all sorts of anniversaries through out our lives. Really there are lots of different kinds. Many types including weddings, company, or even a birthday is a type of anniversary.
At the end of July the hubby and I celebrated our second anniversary. The traditional gift? Cotton. Since we said no gifts because of our splurge to go to Japan and  I love to sew I decided it would be fun to do something with our never ending supply of fabrics.
Since I was in a rush for time, I actually didnt sew a thing! I have seen a bunch of framed "date art" on pinterest which inspired me to do something with our special dates and some states we've been to or lived in.
What do you get when you combine significant dates, states and my supply of cotton (along with an 8 dollar frame I got on clearance at Michaels)?
See below:

Now keep in mind I was in a crunch for time (I made it the day of our anniversary) and was being a bit lazy, had I thought this through a bit more I would have printed on the muslin state pieces through a computer rather than doing it all quickly with a sharpy, and I would have made sure the wording on each state was consistent. But hey, I think it still came out cute, and it was only an 8 dollar anniversary gift! Plus I like how much about our story I incorporated in one item, Where we first met, where we got married, where we live now, and even where we went to school (Alabama fabric background). Not bad for a last minute project!

Onto another type of anniversary! Birthdays! 
My adorable niece is turning two at the end of August. Her mama had her party early so she ended up with gifts early! 
My parents (the grandparents) got her a little kitchen set (since apparently she was using one of their kitchen chairs as her pretend kitchen while mom and dad actually cooked dinner). Anywho, the hubby and I got her a cute little pots and pans set from Amazon. And of course I couldn't help making something for her as well!
I have tons of fat squares that I buy just because I can't resist whenever they go on sale for 50 cents or a dollar. As I am always looking to use up my never ending supply of fabric odds and ends I decided to make something for the little niece to go with her Kitchen set. 
The result? A cute little toddler apron and pot holder (seen below)
Only cost me 2 dollars (plus labor and the time it took to figure out the apron but that was fun!... something different from my normal sewing work!) The shipping was the most expensive part!

I always cherished gifts I got from my Aunts growing up especially if it was something made specially for me... now I just need to get those holiday dresses done so I can use up some more fabric! 

Ah yes anniversaries, of age or any other occasion, I love to find excuses to make something, and usually I do need a reason as motivation! Now to prepare for the Fall season and Holidays... lots of reasons to create (and on a budget at that!)


Wednesday, July 31, 2013

House, Honeymoon,Chair Make-Over

Long time no post! Ok really now Im ready to make this a regular deal!
Quick update : We got our house, been working like crazy on it (when we actually have time to).
Went on our honeymoon to Japan. What an amazing trip! Now we plan to go to France next year to visit my Aunt and maybe a few other countries if we have the vacation time!
And now we are continuing to work on the house.

I have lots to do as far as the make over of our house goes we both do but heres a fun little project that was a result of a compromise between Adam and I. It started with this leather chair:
A brownish leather chair, its one of those super comfy chairs like the ones you just sink into at the library. Problem is it doesn't go with my vision for our new house (and I never really liked the look of it in our apartment). 
I wanted to get rid of the chair, Adam refused. Then I decided to cover it with fabric after seeing an article on Pinterest about how to cover leather furniture. Well the hubby didn't like that idea either because he liked the chair soooo much as a leather chair (and we cannot afford a new leather anything after the Japan trip and buying a house!). 
So I started researching online to find something we could both live with. I found Rub and Restore website here. Since we have a black mantle in our new room (and you can see the cream colored walls in the picture above) I decided to paint/stain this chair Black to continue with whatever vision I have in my mind, though I am not sure what category it falls under! 
I got the 16 oz. bottle of the color (they have a ton of color choices and will even color match for you) stain and 8 oz. of the clear coat/refinish a total including shipping it was about 60 dollars, which is less than what I would have spent on Fabric anyway.
After several, several thin coats of the product, it probably took around 10 hours total which again if I was going to recover it with fabric its probably the same or less time (instructions and all are very simple and included a manual that comes when you order it online plus there are videos on youtube for how-tos as well) Here is the before and after shot


I still have to add the top clear coat, but I have to wait for the stain to cure for 3 days. It took a lot of time, but I am quite happy with the difference. And honestly I dont know if it needs the clear coat but since I bought it I will use it!

What do you think an improvement? Adam says it feels a little stiffer but I honestly think its just more like a new leather chair and needs to be broken in a bit. 
Im happy and now I dont have to look at that hideous brown anymore! 

Til next time! 


Tuesday, March 12, 2013

New Beginnings

Adam and I are about to buy our first house. After a little over a year and half of marriage we have experienced many of the joys and sorrows of life (but not all yet). Having recently moved (a little farther from my family and even closer to his) I have decided to become a blogger.
Why you may ask, its simple: life has new beginnings and you must make the best of the changes that come with the newness. A new home, new jobs, and a bit of a new outlook. 
Living far away from my side of the family and away from many friends I decided its about time to have a way to really keep everyone up to date on our lives as a semi-newly wed couple. 
Plus I have so many ideas for our new house and when I accomplish new projects I would love to have a way to show them off. 

It is very difficult to live far away from family, missing holidays, birthdays and not getting to watch the new little rug-rats of the family grow up except through pictures. We are happy but its hard and sometimes well most I feel like I need another (hopefully consistent way) of a connection with my Yankee half of the family. 

I learned while I went to school at Bama that there are many things I have to learn about being a Southerner. Its fun learning new words and sayings(that sometimes really make no sense),  recipes (that often clog your arteries) and a different way of life which I love...plus the weather is nice(though I do miss the snow on my birthday and Christmas but not the shoveling). As an almost homeowner and excited creative decorator and a still fairly new wife I hope to share my creative projects, southern accomplishments or disasters and all that is exciting and new as Adam and I embark on these New Beginnings in a new home.

Heres to my actually posting regularly and to closing on our house on time!